Exposing a spring bean as a web service
One of the major requirements expected from a web service framework is to expose the existing business components as web services. Spring framework has been using for Enterprise Application development for many years as it provides a more simpler approach than traditional J2EE application development.
WSO2 Web services application server provides an easy-to-use and efficient mechanism for exposing your Spring beans as java web service in a jiffy.
Pre-requisites:
WSO2 web services application server - WSAS2.2 (Download)
Step 1
As the first step, we should implement the Spring class (pojo) which needs to be exposed as the web service. I will write a very simple pojo which has one In-Out method as follows.
package org.ws.test;
public class Inoutbean {
public String echo(String s){
return s;
}
}
Compile and save the class.
Step 2
Now, we need to create the associated spring configuration file.
<?xml version="1.0" encoding="UTF-8"?>
<!DOCTYPE beans PUBLIC "-//SPRING//DTD BEAN//EN" "http://www.springframework.org/dtd/spring-beans.dtd">
<beans>
<bean id="InoutSpringBean" class="org.ws.test.Inoutbean">
</bean>
</beans>
Save the file as spring.xml
Step 3
Bundle the spring class in a jar so that it can be deployed on WSAS. Say the jar file is SpringBeans.jar
Steps 4
Start WSO2 Web services application server (WSAS) and access its management console using https://localhost:9443
Next, select 'Services' from the left navigation menu. You will be directed to the 'Service & Service Group Management' page.
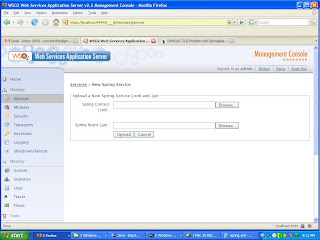
Click on 'Upload Spring service' link.

Step 5
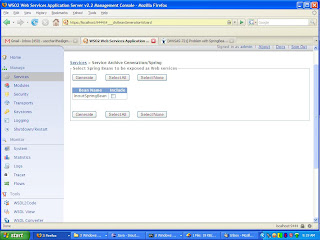
Next, select the SpringBeans.jar and the spring.xml and click on upload. You will be directed to the following screen.

You can select the spring bean from this screen and click on 'Generate' to complete the deployment.
Step 6
Now, the service deployment task is over and you can verify the service invocation with Tryit utility. Or else, just send a REST request as follows and check whether the expected output is returned in your browser
http://localhost:9762/services/InoutSpringBean/echo?s=hi
You may have noticed the ease-of-use when exposing a spring bean through WSO2 WSAS. The same procedure can be applied for any complex spring beans.
Before completing our scenario, you may have a look at the generated service archive by WSAS. It will reside at WSAS_HOME/repository/services. Open the 'SpringBeans.aar' and check the /META-INF/services.xml. You will see the following element there.
<parameter locked="true" name="ServiceObjectSupplier">org.wso2.wsas.admin.service.spring.GenericApplicationContextSupplier</parameter>
This is the most important entity of spring service generation and it instructs WSAS to load the Spring beans from the Spring configuration file.
WSO2 Web services application server provides an easy-to-use and efficient mechanism for exposing your Spring beans as java web service in a jiffy.
Pre-requisites:
WSO2 web services application server - WSAS2.2 (Download)
Step 1
As the first step, we should implement the Spring class (pojo) which needs to be exposed as the web service. I will write a very simple pojo which has one In-Out method as follows.
package org.ws.test;
public class Inoutbean {
public String echo(String s){
return s;
}
}
Compile and save the class.
Step 2
Now, we need to create the associated spring configuration file.
<?xml version="1.0" encoding="UTF-8"?>
<!DOCTYPE beans PUBLIC "-//SPRING//DTD BEAN//EN" "http://www.springframework.org/dtd/spring-beans.dtd">
<beans>
<bean id="InoutSpringBean" class="org.ws.test.Inoutbean">
</bean>
</beans>
Save the file as spring.xml
Step 3
Bundle the spring class in a jar so that it can be deployed on WSAS. Say the jar file is SpringBeans.jar
Steps 4
Start WSO2 Web services application server (WSAS) and access its management console using https://localhost:9443
Next, select 'Services' from the left navigation menu. You will be directed to the 'Service & Service Group Management' page.
Click on 'Upload Spring service' link.

Step 5
Next, select the SpringBeans.jar and the spring.xml and click on upload. You will be directed to the following screen.

You can select the spring bean from this screen and click on 'Generate' to complete the deployment.
Step 6
Now, the service deployment task is over and you can verify the service invocation with Tryit utility. Or else, just send a REST request as follows and check whether the expected output is returned in your browser
http://localhost:9762/services/InoutSpringBean/echo?s=hi
You may have noticed the ease-of-use when exposing a spring bean through WSO2 WSAS. The same procedure can be applied for any complex spring beans.
Before completing our scenario, you may have a look at the generated service archive by WSAS. It will reside at WSAS_HOME/repository/services. Open the 'SpringBeans.aar' and check the /META-INF/services.xml. You will see the following element there.
<parameter locked="true" name="ServiceObjectSupplier">org.wso2.wsas.admin.service.spring.GenericApplicationContextSupplier</parameter>
This is the most important entity of spring service generation and it instructs WSAS to load the Spring beans from the Spring configuration file.


Comments