Securing Axis2/WSAS web services with Username token
Security is a crucial requirement in distributed computing. When it comes to web services, it is even more important. Apache rampart is the module which is used to secure an Axis2 web service. There are numerous approaches to secure your Axis2 web service using rampart module. Username token authentication can be considered as the simplest mechanism to protect your service. Lets see how the username token authentication is enabled in your web service and write a client easily using WSO2 WSAS which dramatically simplifies most of the complex steps.
I will demonstrate the scenario using WSO2 WSAS 2.2.1. You can follow most of the steps given here with Axis2 as well.
Lets assume WSO2 WSAS is configured in your system and it is up and running. (See WSAS installation guide if you want to know how WSAS is deployed).
Step 1
Access WSAS management console using https://localhost:9443 and log in using default admin credentials (admin/admin).
I'm going to explain how to secure one of the default services deployed on WSAS using username token authentication mechanism. Therefore, we have to create a user who will be granted permission to invoke the service.
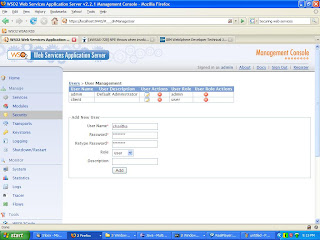
Go to users-->user management screen and create a new user (i.e username=charitha, password=charitha).

Step 2
Now we need to enable security on one of the services available in WSAS management console. Select 'version' service in services and service group management page. You will be directed to the service management page of the version service. Select 'Manage security configuration' link.
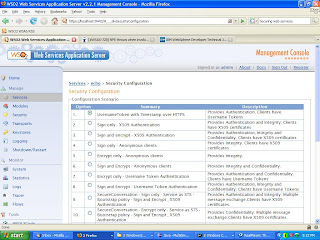
Following page will be displayed where you can select 'UsernameToken with Timestamp over HTTPS' option.

Now you should be in the Services> version>Security Configuration> scenario1' page. Assign the user(charitha) which has been created in the previous step to version service. If everything is successful you will get "Security scenario successfully applied" message.
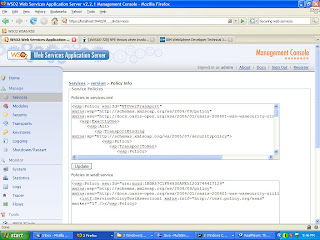
We have seen how WSO2 WSAS simplified assigning a security configuration to our web service. You will see that version service is exposed only through https transport after assigning the UT scenario. Also, you can check the security policy which has been generated by WSAS if you click on 'Edit service policies' link in the service management page.

The server side security configuration has been completed by now. Lets write a java client and invoke the service securely!
Step 3
WSAS provides a very useful code generation utility which can be used to generate a client stub easily. Select version service and click on 'Generate Client' link. You will be directed to 'Services>version>Stub generation' page. Set unpack class option to false and click on 'Generate' by leaving the other default options.
Save the generated client jar file in your file system.
Step 4
Next, we need to provide user authentication information to the client. We are going to configure our java client through a client side security policy. Therefore, we need to write our policy.xml and client needs to be written to read that policy. I'm not going to describe all the information available in client security policy. Please download policy.xml from here and save it in your file system. In the mean time, we should have a look at the RampartConfig element in policy.xml because it is where we configure the user information.
<ramp:RampartConfig xmlns:ramp="http://ws.apache.org/rampart/policy">
<ramp:user>charitha</ramp:user> <ramp:passwordCallbackClass>org.test.PWCBHandler</ramp:passwordCallbackClass>
</ramp:RampartConfig>
Here you can see that password of the user is supplied through a PasswordCallBack handler class (PWCBhandler in our example).
public class PWCBHandler implements CallbackHandler { public void handle(Callback[] callbacks) throws IOException, UnsupportedCallbackException { for (int i = 0; i <> WSPasswordCallback pwcb = (WSPasswordCallback)callbacks[i]; if (pwcb.getUsage() == WSPasswordCallback.USERNAME_TOKEN_UNKNOWN) { if(pwcb.getIdentifer().equals("charitha") && pwcb.getPassword().equals("charitha")) { return; } else { throw new UnsupportedCallbackException(callbacks[i], "check failed"); } } pwcb.setPassword("charitha"); } } }
Compile and save the callbackhandler class and make it available in your client class path.
Step 5
We are going to complete our scenario by constructing the client using the generated stub in step 4.
In our client, first we need to set the system properties for SSL since we are going to access version service via https. (Please modify keystore path according to your file system)
System.setProperty("javax.net.ssl.trustStore","C:\\wsas\\wsas-2.2.1\\wso2wsas-2.2.1\\conf\\wso2wsas.jks"); System.setProperty("javax.net.ssl.trustStorePassword", "wso2wsas");
We need to instruct our client to use rampart module, we cannot simply add a mar(module archive) to our class path. Therefore we can create a configurationContext instance using file system and use it as follows.
ConfigurationContext ctx = ConfigurationContextFactory.createConfigurationContextFromFileSystem("C:\\wsas\\client-repo\\", null);
Next, create an instance of version service stub with passing the above Configurationcontext as an argument in the constructor.
VersionStub stub = new VersionStub(ctx, "https://192.168.1.2:9443/services/version");
Rampart module can be engaged in client as follows.
stub._getServiceClient().engageModule("rampart");
Next, the policy.xml which has been defined in step 4 needs to be loaded. We can do that using ServiceClient options class by setting it as a property.
Options options = stub._getServiceClient().getOptions();
options.setProperty(RampartMessageData.KEY_RAMPART_POLICY, loadPolicy("C:\\wsas\\client-repo\\policy.xml"));
stub._getServiceClient().setOptions(options);
private static Policy loadPolicy(String xmlPath){
StAXOMBuilder builder = new StAXOMBuilder(xmlPath);
return PolicyEngine.getPolicy(builder.getDocumentElement());
}
Everything is ready! We can run our client now. Make sure to add jars included in WSO2WSAS_HOME/lib to your class path.
You can download source of the client from here.
I will demonstrate the scenario using WSO2 WSAS 2.2.1. You can follow most of the steps given here with Axis2 as well.
Lets assume WSO2 WSAS is configured in your system and it is up and running. (See WSAS installation guide if you want to know how WSAS is deployed).
Step 1
Access WSAS management console using https://localhost:9443 and log in using default admin credentials (admin/admin).
I'm going to explain how to secure one of the default services deployed on WSAS using username token authentication mechanism. Therefore, we have to create a user who will be granted permission to invoke the service.
Go to users-->user management screen and create a new user (i.e username=charitha, password=charitha).

Step 2
Now we need to enable security on one of the services available in WSAS management console. Select 'version' service in services and service group management page. You will be directed to the service management page of the version service. Select 'Manage security configuration' link.
Following page will be displayed where you can select 'UsernameToken with Timestamp over HTTPS' option.

Now you should be in the Services> version>Security Configuration> scenario1' page. Assign the user(charitha) which has been created in the previous step to version service. If everything is successful you will get "Security scenario successfully applied" message.
We have seen how WSO2 WSAS simplified assigning a security configuration to our web service. You will see that version service is exposed only through https transport after assigning the UT scenario. Also, you can check the security policy which has been generated by WSAS if you click on 'Edit service policies' link in the service management page.

The server side security configuration has been completed by now. Lets write a java client and invoke the service securely!
Step 3
WSAS provides a very useful code generation utility which can be used to generate a client stub easily. Select version service and click on 'Generate Client' link. You will be directed to 'Services>version>Stub generation' page. Set unpack class option to false and click on 'Generate' by leaving the other default options.
Save the generated client jar file in your file system.
Step 4
Next, we need to provide user authentication information to the client. We are going to configure our java client through a client side security policy. Therefore, we need to write our policy.xml and client needs to be written to read that policy. I'm not going to describe all the information available in client security policy. Please download policy.xml from here and save it in your file system. In the mean time, we should have a look at the RampartConfig element in policy.xml because it is where we configure the user information.
<ramp:RampartConfig xmlns:ramp="http://ws.apache.org/rampart/policy">
<ramp:user>charitha</ramp:user> <ramp:passwordCallbackClass>org.test.PWCBHandler</ramp:passwordCallbackClass>
</ramp:RampartConfig>
Here you can see that password of the user is supplied through a PasswordCallBack handler class (PWCBhandler in our example).
public class PWCBHandler implements CallbackHandler { public void handle(Callback[] callbacks) throws IOException, UnsupportedCallbackException { for (int i = 0; i <> WSPasswordCallback pwcb = (WSPasswordCallback)callbacks[i]; if (pwcb.getUsage() == WSPasswordCallback.USERNAME_TOKEN_UNKNOWN) { if(pwcb.getIdentifer().equals("charitha") && pwcb.getPassword().equals("charitha")) { return; } else { throw new UnsupportedCallbackException(callbacks[i], "check failed"); } } pwcb.setPassword("charitha"); } } }
Compile and save the callbackhandler class and make it available in your client class path.
Step 5
We are going to complete our scenario by constructing the client using the generated stub in step 4.
In our client, first we need to set the system properties for SSL since we are going to access version service via https. (Please modify keystore path according to your file system)
System.setProperty("javax.net.ssl.trustStore","C:\\wsas\\wsas-2.2.1\\wso2wsas-2.2.1\\conf\\wso2wsas.jks"); System.setProperty("javax.net.ssl.trustStorePassword", "wso2wsas");
We need to instruct our client to use rampart module, we cannot simply add a mar(module archive) to our class path. Therefore we can create a configurationContext instance using file system and use it as follows.
ConfigurationContext ctx = ConfigurationContextFactory.createConfigurationContextFromFileSystem("C:\\wsas\\client-repo\\", null);
Next, create an instance of version service stub with passing the above Configurationcontext as an argument in the constructor.
VersionStub stub = new VersionStub(ctx, "https://192.168.1.2:9443/services/version");
Rampart module can be engaged in client as follows.
stub._getServiceClient().engageModule("rampart");
Next, the policy.xml which has been defined in step 4 needs to be loaded. We can do that using ServiceClient options class by setting it as a property.
Options options = stub._getServiceClient().getOptions();
options.setProperty(RampartMessageData.KEY_RAMPART_POLICY, loadPolicy("C:\\wsas\\client-repo\\policy.xml"));
stub._getServiceClient().setOptions(options);
private static Policy loadPolicy(String xmlPath){
StAXOMBuilder builder = new StAXOMBuilder(xmlPath);
return PolicyEngine.getPolicy(builder.getDocumentElement());
}
Everything is ready! We can run our client now. Make sure to add jars included in WSO2WSAS_HOME/lib to your class path.
You can download source of the client from here.


Comments
org.apache.axis2.AxisFault: java.lang.RuntimeException: Unexpected error: java.security.InvalidAlgorithmParameterException: the trustAnchors parameter must be non-empty
at org.apache.axis2.AxisFault.makeFault(AxisFault.java:430)
at org.apache.axis2.transport.http.SOAPMessageFormatter.writeTo(SOAPMessageFormatter.java:83)
at org.apache.axis2.transport.http.AxisRequestEntity.writeRequest(AxisRequestEntity.java:84)
at org.apache.commons.httpclient.methods.EntityEnclosingMethod.writeRequestBody(EntityEnclosingMethod.java:499)
at org.apache.commons.httpclient.HttpMethodBase.writeRequest(HttpMethodBase.java:2114)
at org.apache.commons.httpclient.HttpMethodBase.execute(HttpMethodBase.java:1096)
at org.apache.commons.httpclient.HttpMethodDirector.executeWithRetry(HttpMethodDirector.java:398)
at org.apache.commons.httpclient.HttpMethodDirector.executeMethod(HttpMethodDirector.java:171)
at org.apache.commons.httpclient.HttpClient.executeMethod(HttpClient.java:397)
Did you point to the exact location where the wso2wsas.jks is placed?
Following forum thread will help you to isolate the issue.
http://forums.sun.com/thread.jspa?threadID=580496&tstart=120
BTW, the article is extremely useful.
Thanks,
Yumani